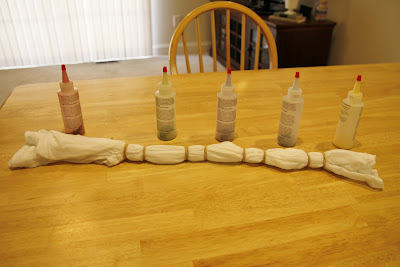
I found a great DIY striped tie-dye tee tutorial by Sara at Short of Something and adapted it to fit the supplies that were available to me and my multicolored design idea.
I found this Tulip tie-dye kit which includes blue, red, purple, green, and yellow dye, and grabbed a pack of black dye. I calculated that it would be more cost effective to buy the kit and use the bottle meant for purple dye with my black dye than to purchase individual dyes and condiment bottles. Then I sent Mr. Q a text message convincing him that a tie-dye kit is AN INVESTMENT. See where it says, "makes up to 20 shirts?" We are going to be READY for football season, school spirit days, holidays, and 60's theme parties.
Someone, please, invite us to a 60's theme party.
The text on the back of the package says that tie-dye kits are great for slumber parties. Let's tie-dye, eat popcorn, and watch Clueless! Sounds like a good night to me. We can watch Bring it On if you're tired of Clueless.
The Tulip kit includes 5 bottles with caps already containing powdered dye, a project guide, extra dye, rubber bands, and cheapo gloves like you get when you work in food service at a county fair.
I found a shirt for $4.48 at the local big box shirt that was a v-neck (my favorite) and 100% cotton (natural materials take the dye better than synthetic fabrics). I bought a size larger than I normally wear because one of the last steps in the process is washing the dyed shirt in HOT water and I knew it would shrink.
I washed my shirt, accordion folded it, then adapted Sara's DIY striped tie-dye tee directions to fit the design in my head. I wanted the top of the shirt to be a big red stripe, followed by green, black, yellow, and blue with a thin white stripe in between each colored band.
After double-checking Sara's directions, I covered my white stripe sections with plastic wrap and secured the wrap with more rubber bands.
It made me sad to pour out the purple dye that was already in the bottle. What a beautiful fuschia shade it was going down the drain of my kitchen sink. The red, green, yellow, and blue dyes were easy - just fill with tap water to the line printed on the bottle, and shake. I did have to pound on the bottoms of the bottles a bit to get the dye to mix with the water.
The black dye packet was intended for making a big pot of dye, so I adapted the recipe similar to what Sara did for a bottle- I put a little salt in the bottle, added as much black dye as there was powdered dye already in the other bottles, then added HOT water up to the line. When I shook it up, it looked to be about the same consistency as the other bottles.
It was time to take everything outside. I had an old shower curtain I'd been saving for messy projects, so I laid it out on the patio. I don't think the rental company would appreciate me dying their concrete in Olympic colors.
I applied the dye really heavily because I wanted my stripes to be as solid as possible, then flipped my little t-shirt snake over and gave the other side a good soaking. For more of a classic tie-dye look I would've used less dye.
Following the directions in the Tulip project guide, I kept my t-shirt wrapped in plastic wrap for 6 hours, then removed all of the wrap and rubber bands and washed it in hot water with a small amount of detergent in my washing machine, then ran it through the dryer.
Here's the finished product!
My tie-dye kit found a new home in a shoebox. Amanda says the dye will keep in the bottles for quite a while.
This is what was really happening while Mr. Q did my fashion shoot :)
LINKING UP:
GO WORLD! P.S. Tulip did not compensate me in any way for this post, but their dye is great!


Your shirt looks great! Love the Olympic rings! Thanks for sharing at the All Star Block Party.
ReplyDeleteHolly
Thank you Holly!
DeleteLike it!! I've never tie-dyed anything.
ReplyDeleteThanks Mrs. DiscoBows! It's easy but messy :)
DeleteTutorial on your tshirt was so easy to follow,Thanks for sharing. Stopping by to say Hi from the blog hop. Come visit sometime, tea is cold and no shoes are required. Kathy B. http://www.southernmadeintheshade.blogspot.com New follower
ReplyDeleteThanks so much Kathy! I'll definitely stop by :)
DeleteThis turned out great, i've never done any tie die myself but i will have to give this a go
ReplyDeletei would love for you to join us at live love laugh and link up this amazing creation
http://live-love-laugh-interiordesign.blogspot.com.au/
Thanks- I am going to be adding quite a few striped shirts to my own closet.
DeleteHeather,
ReplyDeleteThis is super cute! Thanks for sharing at Creative Thursday last week. I appreciate YOU! Can't wait to see what you link up next :)
Michelle
Thanks so much Michelle! Hopefully I can keep the crafts coming when school starts :)
DeleteWhat a fun idea. Thanks for sharing at my linky par-tay. Please do come back again.
ReplyDeleteWarmly, Michelle