Saturday, December 31

Top 10 Favorite Home Things 2011

The Country Townhouse is still a baby home for Mr. Spin and I - it hasn't quite been six months for us yet!  My favorite part of being a newlywed has been decorating my home with my husband, making it feel like "ours" instead of mine or his, and discovering our shared style (I lean toward cottage/traditional style, he gravitates toward sleek modern style... yet loves throwing around words like "rustic" and "distressed" since he started working in the home decor industry!).  I thought I would share some pictures of and stories behind my favorite things in our little dwelling place.

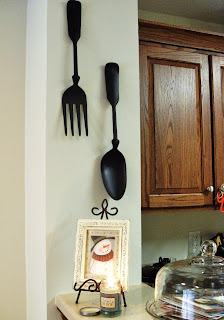
Giant metal cutlery may also be used as a weapon in the Zombie Apocalypse.

1. Metal fork and spoon
I think Mr. Spin thought I was a little crazy when the first thing I brought into our home was a big black fork and spoon.  It was a non-negotiable for me; "my" kitchen was GOING to have giant metal cutlery.  My Mamaw's kitchen had a big black fork and spoon on the wall and it was the happiest kitchen in the world.  My mom gave me these, which were in storage from when she and my dad rocked the giant cutlery look in the 70's.  I gave them a new coat of black paint to look more like Mamaw's set.  Getting them on the wall was tricky because there is a duct right behind them.  Thanks, 3M products!

This is how I used my cake stand during the Christmas season.
Check out that attractive bunny card from my friend Debbie's letterpress studio!

I apologize for the blurry picture; I was doing a weird crouch thing to get level with the countertop.

2. Cake stands
I developed a little dessert table obsession while wedding planning and acquired a gorgeous white ruffly cake stand from Pier1 (my mom purchased a second one for symmetry's sake at the wedding; it, of course, lives with her).  I had mentioned to Mr. Spin that I wanted a glass cloche for the stand, and he did me one better- for Christmas he got me this anchor cake stand with dome that also turns into a punch bowl.

Hello, my personal fluffy cloud.

3. Master bedroom bedding
Softest. Comforter. In the world.  Ivory, purple, and blue = wedding colors/the best colors ever.  Plus some gray to make it modern.  And those accent pillows are adorable.


Keep your friends close and your Harry Potter books closer.


4. Bookshelf
My life felt so disorganized up until we got this bookshelf.  While Mr. Spin likes a cherry finish on furniture, I prefer espresso.  He didn't even argue with me on what color the bookshelf should be for the guest room/office - espresso all the way!  Now my books have a home, sorted by genre and author, and my craft supplies are (mostly) in one place- ignore that Sephora box because it will be replaced by a nice basket soon.

The crate that stole my heart.

5. Corned beef crate
Mr. Spin and I met at a restaurant called Corned Beef.  When I saw this crate at the antique mall in my hometown I knew I had to have it.  I wanted to use it as wedding decor in some way, but that didn't happen, so home decor it is.  It's the constant in my seasonally-changing kitchen cabinet-top vignette.


Old picture because the table is currently a victim of a lesson planning tornado.
Home decor industry husbands are great at hanging art.


6. Autumn mountains painting
This painting was my favorite thing Mr. Spin's company makes.  Like most things I love, it was discontinued. This one had been sold, but the person who bought it never paid for it... so Mr. Spin cancelled the order, paid for it, and now it hangs above our table.  I am a mountain woman through and through, my favorite season is autumn, and I like to pretend that this is the view out my window.


Blue Mason jars are another obsession... but I only have one.


7. Flower bowls
I collect bowls shaped like flowers... for no reason other than they make me happy.  The colorful set is antique, from Japan, and wasn't really a "collection" until I got the blue and green set, which is from Target.  I'm not picky.


We will need a new calendar... Snow and Graham or Kraft Paper?


8. Paint chip mosaic
Yep, I'm pretty proud of this thing.  I may do another one in less Christmas-y colors eventually.


9. Wonder painting
Just a little bargain-bin thing from Bed Bath and Beyond... that just happened to perfectly match the shower curtain left in the guest bathroom by my friend who lived here before us.  It's so cheerful, with the butterflies and WONDER motto, that I smile every time I look at it.

I do believe these are from ABC Distributing and have been discontinued...
here is something similar with purple flowers and text that they offer now.


10. Botanical canvases
These were a gift from my best friend Breeze and I wasn't sure I'd be able to use them in the townhouse.  Black and green?  But they make my laundry room happy and zen-like.

Linking up to What You Talkin' 'Bout Wednesday? at Literally Inspired
Saturday, December 24

Merry Christmas from the Country Townhouse!

I am really pleased with the way our tree turned out!

We purchased two new types of ornaments this year.  Early in my quest for a red, silver, and burlap rustic Christmas look, I learned that Mr. Spin does not like the combination of shiny + red.  He was, however, digging the matte red ornaments.  Most matte ornaments are sold in combination with shiny ornaments, but we found a pack at Michael's for $8 that was all matte and Mr. Spin added it to our cart with no question!

Over the spring and summer, while wedding planning, my obsession was milk glass.  Now, with the holidays approaching, my attention has turned to mercury glass.  I found these adorable Smith and Hawken acorns at Target!


Love this engraved glass ornament, a wedding gift from my best friend at work:

Here's my new favorite ornament of them all:
It doesn't hurt that it came attached to some delicious homemade candy.  If every one of this kid's teachers got the same ornament, I don't need to know.

Ornaments that wouldn't fit on the tree got their own special place with some scented pinecones.  The mercury glass candleholders are from Michael's - I will only use LED candles in them because I don't want them to get messed up!

Merry Christmas Everyone!

Linking to Holiday Link Party at Momnivore's Dilemma.
Photobucket

Friday, December 23

Holiday Craft: No-Sew Ruffle Tree Skirt

My favorite craft of all this Christmas is my ruffled tree skirt.  Like many other bloggers I was inspired by Marian's gorgeous linen tree skirt.  I found Ashley's tutorial really helpful.  Since there are plenty of tutorials already out there, I mostly just want to show off my own take on this popular project.

The fabric materials:  a very ugly tree skirt from the dollar store, 2 yards of burlap, 2 yards of gingham, and a yard of awesome "BELIEVE" printed fabric that I couldn't resist (I know the people who designed the Believe fabric were probably referring to Santa, but for me it's a reminder that Christmas is about our belief in our Savior's miraculous birth!)

I crafted this thing through two and a half cheesy ABC Family movies- I can't resist those 90's television stars.  Oh, Jonathan Taylor Thomas, where are you now?  There's also a nice power outlet near the television for my little pink glue gun.

If you take on this project, buy extra glue sticks, and be prepared for some burnt fingers if you use burlap- glue has a way of seeping through the fabric's wide weave.

Originally (the first two rows around the outside of the tree skirt) I was making the ruffles really tight and going through a LOT of fabric.  You can see in the next picture that the ruffles got bigger as I worked my way into the middle of the tree skirt... that was so I wouldn't have to make an emergency trip to the fabric store.  I alternated the print fabrics with burlap.

More than halfway done!

The finished project!  My little Hallmark singing sled guys are hiding the surge protector.  I'd seen the tip somewhere to use tissue paper to fluff up the tree skirt.  I didn't have extra tissue paper laying around, so I used plastic grocery bags.  It really does make a difference to have a nice fluffy tree skirt as opposed to it just lying flat on the ground.

Linking up to Whatcha Got Weekend at Lolly Jane Boutique!

What has been your favorite holiday project this year?

Wednesday, December 21

Holiday Craft: Silk Floral Wreath

When I started to see wreaths crop up on front doors in our neighborhood right after Thanksgiving, I found myself suffering from a condition probably unique to crafters:  Wreath Envy.  Wreaths are one of my favorite crafts, and for the front door I wanted something sturdy.  I started with a basic $4 wreath form from Michael's and several stems of silk florals.  I cut the stems apart with wire cutters and that's basically the toughest thing about this project.

Materials ready to go.

You just stick the stem into the wreath and push.  That's it.  If the stem sticks out too far in the back, either trim it with the wire cutters or weave it back through.

Holiday Craft: Paint Chip Mosaic

I'd had a few paint chip mosaic pictures from Real Housewives of BC and Junk in Their Trunk hanging around my Pinterest for months when inspiration struck me:  why not create a CHRISTMAS paint chip mosaic?  If you haven't seen this project yet, let me tell you that it is an easy way for those of us without art degrees to create display-worthy pieces of art!

First, Mr. Spin and I headed to Lowe's to steal paint chips and purchase wood stain (I got Minwax Dark Walnut), a paintbrush, and art hanging doodads.  I already had foam brushes, spray adhesive, and Mod Podge.  Then, Mr. Spin snagged a 2' by 2' piece of plywood from work.  This is another one of those times when it's awesome to have a husband who works in the home decor industry.

My plywood, stained Dark Walnut.  I used a foam brush to apply the stain and let it dry overnight.

I used a paper cutter to trim all of my paint chips to uniform size.  I left the names on a few that were somewhat Christmas-y:  Graham Cracker Crust, Heirloom Red, Village Green, Evergreen, etc.  After making a few practice arrangements, I sprayed some adhesive and started sticking on the chips.

I used my trusty tape measure to make sure my plywood "border" was about the same distance on each side.  I left a much larger border than some of the other versions of this project I've seen because I love the somewhat rustic look of the wood around the mosaic.

After all the chips were laid down, I used a bristly brush to Mod Podge the whole thing in different directions.  When it dried, the Mod Podge was so shiny and Mr. Spin tried to persuade me to leave it because the next step made him nervous!  But believe me, the next step is where the real beauty comes in!

Scary, right?  Another layer of woodstain applied with a foam brush all over, then wiped off with a paper towel after drying a little.

Voila!  The finished project looks really good because the woodstain picks up the grain left by the Mod Podge.  I sealed the whole thing with a final layer of Mod Podge after the wood stain dried.  Look at that shine!

I attached the mounting hardware.  And it was totally jacked up.  So Mr. Spin fixed it.  I did not document that process on camera.

Here's the finished product hanging in our kitchen!  Let me know what you think.

Linking up to Restored It Wednesday...

literally inspired


Funky Junk's Sat Nite Special


Tuesday, December 20

Entertaining: Easy Guest Room Updates

Christmas Guest room from Pinterest via A Ribbon at a Time

One of my goals for the Country Townhouse is to have a nice guest room/office that I have no qualms about letting friends and family members stay in!  We've got a long way to go, but the upcoming holidays, along with my friend Philly letting us know that she will be able to come stay with us during her Winter Break from graduate school, are inspiring me to take some steps in a more organized direction.

Ticking Stripe bedding from Plow & Hearth

Here are some ideas to help make guest rooms ready for visitors.

1.  Clean sheets and a warm sweater blanket or wool throw for chilly nights
Just because the guest bed is the least used one in the house doesn't mean it can be the most uncomfortable one.  If you use an old mattress in the guest room, add a foam egg crate or mattress pad to up the comfort factor.  Since everyone prefers a different thermostat setting, leave a few blankets folded at the foot of the bed so guests can cover up as needed.

2.  A good lamp


3.  An alarm clock


4.  Some books
In our case, a lot of books, because the guest room is also our office... but I think it's always nice when a friend recommends a good read... and a jet-lagged friend needs something to do in the morning when you are still asleep.

5.  Flowers!
I spent some time visiting my friends Mr. and Mrs. H in Seattle last year and one of the nicest little touches for me as a guest was the vase of fresh flowers beside my bed.  It made me feel so special and welcome in their home.  If your garden is empty this time of year, snag a bunch of flowers from the grocery store to place in a pretty vase, cool old can, or even a pretty mug.  It's a great way to add some seasonal color if you have a neutral color scheme in your guest room.


Monday, December 19

Christmas PIN-spiration: Homespun holiday...

Cinnamon stick wreath via Dishes & Designs

Wooden reindeer by SlippinSouthern on Etsy, $79


Snowflake Stocking from Plow & Hearth

Snowflake and kraft paper gift wrap by How About Orange

Pottery Barn jingle bell vase filler via Mad In Crafts


Cheese Straws recipe from Better Homes and Gardens

Peppermint brownie cookies from Cooking Classy